
We are very excited today because we are sharing a Full Width JQuery Content Slider For Blogs or any websites. This is a static content slider here you have manually add link and images of your preferred posts you can add any number of posts links and images.
We used JQuery to create this slider because of cross browser support and less script more functionality.
This is a premium slider when it comes to features. But we are publishing it for free so that all blogs or websites can use it on their blogs and support us.
This Slider Loops again and again the images means when the user reached the last slide the slider again go back to start from the first slide.
We also used Oswald Font as it looks good in the slider but it is on you if you don't want to add that you can do it easily by removing the script.
So Let start adding the widget it is very easy.
We used JQuery to create this slider because of cross browser support and less script more functionality.
This is a premium slider when it comes to features. But we are publishing it for free so that all blogs or websites can use it on their blogs and support us.
Some of the important features we like to share are:
- This Slider is a full width and will fit to your blog sections from a small 400px to large 1920px. Add it and enjoy
- This Slider has a Sliding Left and Right effect thanks to JQuery Framework. The Content Title also has sliding effects.
- The look of the slider is Classic Looks amazing on large Screen Devices. We used Font Awesome icons.
- You can Customize this slider in many ways from it looks to its functionality, its effects, its speed etc
- Auto Sliding Feature is also enabled and has controls like the duration, speed.
This Slider Loops again and again the images means when the user reached the last slide the slider again go back to start from the first slide.
We also used Oswald Font as it looks good in the slider but it is on you if you don't want to add that you can do it easily by removing the script.
So Let start adding the widget it is very easy.
Adding The Widget For Blogger Users:
STEP 1: Log in to your Blogger account and Go to your Blogger Dashboard

STEP 2: In The Left Side Bar You will find Layout Section as highlighted in the image above Click on Layout.

STEP 3: Click On "Add a Gadget" As highlighted in the image above.
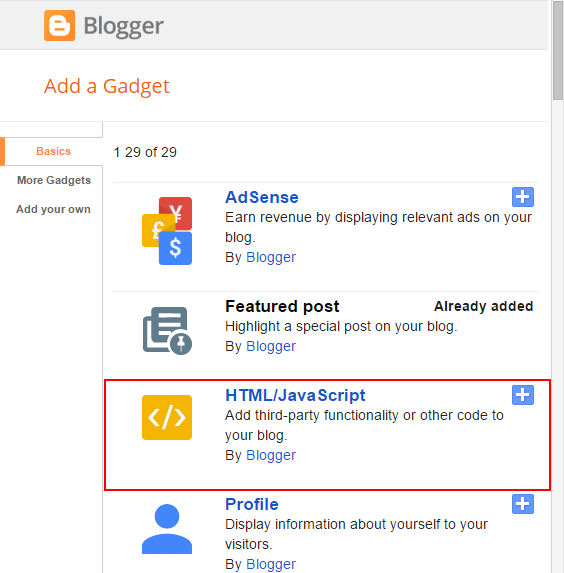
STEP 4: After Clicking on "Add a Gadget" Choose "HTML/JavaScript" from the list & as highlighted in the image above.
STEP 5: Now Copy This Below Code And Paste it in The Empty Box of the "HTML/JavaScript" Section.
If you have already added JQuery and Oswald Font script in your blog then don't add this two scripts highlighted in red color.
<script src="https://cdnjs.cloudflare.com/ajax/libs/jquery/3.2.1/jquery.min.js"></script>
<link href="https://fonts.googleapis.com/css?family=Oswald" rel="stylesheet">
<link rel="stylesheet" href="https://cdnjs.cloudflare.com/ajax/libs/font-awesome/4.7.0/css/font-awesome.min.css" />
<link rel="stylesheet" href="http://files.allbloggertricks.com/fullWidthSlider.css">
<div class="SliderOuterWrap">
<span id='prev'><i class="fa fa-arrow-circle-left"></i></span>
<div class="slidesWrap">
<div class="slide">
<div class="abt_post_title">
<h3><i class="fa fa-info-circle" aria-hidden="true"></i>
<a href="Link To Your Post Here">
<!--Your Post Title Here-->
</a>
</h3>
</div>
<img src="your 1st image url here" alt="">
</div>
<div class="slide">
<div class="abt_post_title">
<h3><i class="fa fa-info-circle" aria-hidden="true"></i>
<a href="Link To Your Post Here">
<!--Your 2nd Post Title Here-->
</a>
</h3>
</div>
<img src="your 2nd image url here" alt=""></div>
<div class="slide">
<div class="abt_post_title">
<h3><i class="fa fa-info-circle" aria-hidden="true"></i>
<a href="Link To Your Post Here">
<!--Your 3rd Post Title Here-->
</a>
</h3>
</div>
<img src="your 3rd image url here" alt="">
</div>
<div class="slide">
<div class="abt_post_title">
<h3><i class="fa fa-info-circle" aria-hidden="true"></i>
<a href="Link To Your Post Here">
<!--Your 4th Post Title Here-->
</a>
</h3>
</div>
<img src="your 4th image url here" alt="">
</div>
</div>
<span id='next'><i class="fa fa-arrow-circle-right"></i></span>
</div>
<script>
var speed = "slow";
var autoslide = true;
var autoSlideDuration = 5000; // 5 Seconds
</script>
<script src="http://files.allbloggertricks.com/FullWidthSlider.js"></script>
What if you want to add more slides or remove some slides ?
Yes You can do it if you want to add more slide the all you need to do is copy the below block of code starting from class slide to the end of that div and paste it after the dark green highlighted div.
Yes You can do it if you want to add more slide the all you need to do is copy the below block of code starting from class slide to the end of that div and paste it after the dark green highlighted div.
<div class="slide">
<div class="abt_post_title">
<h3><i class="fa fa-info-circle" aria-hidden="true"></i>
<a href="#">
<!--Your Post Title Here-->
</a>
</h3>
</div>
<img src="your image url here" alt="">
</div>
That's it Thanks For Following The Tutorial Now Its time For Customization to make it as it made for your site.
Customization:
- The Red Highlighted Text is responsible for Oswald Font Link, Font-awesome and Jquery Script if you already included this style-sheet and script in your blog template then please don't add this both in your blog .
- The Orange Highlighted Text is Responsible for The Title of your posts or caption of your image. and Orange text is responsible for the link to your post.
- The Light-blue Highlighted Text is Responsible For The Images in slides.
JavaScript Part:
- The Light-green Highlighted Text is Responsible For The Sliding Speed of the slider. By Default it is slow you can change it to medium, Fast and you can add numbers like 1000 means 1 second.
- The Yellow Highlighted Text is Responsible For The Enabling and disabling of the auto sliding feature.
- The Pink Highlighted Text is Responsible For The Duration of switching of slides of the auto sliding feature.
Adding Extra Slide:
- The Green Highlighted div at the bottom of the main code. after this div you have to add the block of code given above.
STEP 6: All Done Save the Gadget and Check it in your blog.
Adding in other static websites:
Just copy the main Block of code given above and paste it where ever you want the slider should appear. If you are facing problems then contact us we will help you.
Conclusion:
Yes we added the content slider finally. Now review it and customize it so that it should fit in your site.
And those who have added this widget successfully without any hurdles congrats to them. and if you want any styling or improvement notify us we will try to add it for you.
And those who have added this widget successfully without any hurdles congrats to them. and if you want any styling or improvement notify us we will try to add it for you.
That's It Thanks For Following our Tutorial '' Full Width Feature Rich Animated Content Slider For Blog/Website '' Along With us If you found any difficulty Please Comment and Share Your Valuable Opinion. And Stay tuned for More Tutorials Like This and Share this with your friends.


No comments:
Post a Comment