How To Add Smart Sticky Notification Bar v1.0 in Blogger Blogs?
Hello Everyone We are back with one of the most beautiful and Responsive Smart Sticky Notification Bar v1.0. This Widget is Amazing written in HTML and JavaScript & Decorated using CSS. We have used very less JavaScript so that the widget should load fast.
What is Smart Sticky Notification Bar v1.0?
Smart Sticky Notification Bar v1.0 is a Sticky widget which will be always at top even if you scroll the page. You can Add your Notifications like Trending Today, Announcement, Your Featured Post etc. So This Widget is Responsive and can be customized with few tweaks. This Smart Sticky Notification Bar v1.0 has Show and Hide Button and it is free from any watermark so that you can use it freely.
Why To Use Smart Sticky Notification Bar v1.0?
Smart Sticky Notification Bar v1.0 is Recommended Because this is Sticky Widget and it will be present at top of your site every time even if your visitors scroll the page so you can add your very important links, Notifications, Upcoming Events, Announcement etc.
Important Features of Smart Sticky Notification Bar v1.0
- It is very fast We have Used Very Less Code.
- It has Hide and Show Button With Sliding Effects
- It can be Customized You can Change it According to your Wish
- It is Free without any watermark or any limitations you can use this widget in any of your Site or Blog.
- We Have used FontAwesome icons so that it looks beautiful and official.
Let Start! How To Add Smart Sticky Notification Bar v1.0 in Blogger Blogs?
We have Divided The Tutorial Into Three Parts CSS, HTML & JavaScript
STEP 2: After Clicking on Edit HTML Search for We have Divided The Tutorial Into Three Parts CSS, HTML & JavaScript
- Go To Blogger > Template
- Backup your template
- Click "Edit HTML"
- Just after <head> paste the following Font-awesome and JQuery Script:
<link rel="stylesheet" href="https://cdnjs.cloudflare.com/ajax/libs/font-awesome/4.7.0/css/font-awesome.min.css" />
<script src="https://cdnjs.cloudflare.com/ajax/libs/jquery/3.2.1/jquery.min.js"></script>
If You Already Have Font-awesome and JQuery Scripts then please skip the Above step
First We Will Add Some Styling ( CSS ):
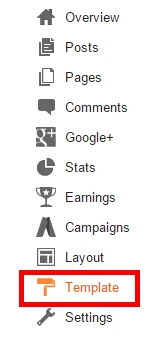
STEP 2: In The Left Side Bar You will find Template Section as highlighted in the image above Click on Template.
STEP 3: Click On Edit HTML.
STEP 4: After Clicking on Edit HTML Search for
]]></b:skin>
STEP 5: Copy This Below Code Before ]]></b:skin>
.TW_Notification_Wrap {
width: 100%;
min-height: 40px;
margin: 0px;
padding: 0px;
box-sizing: border-box;
position: fixed;
z-index: 999999;
top: 0px;
left: 0px;
}
.TW_Notifications_innerWrap {
overflow: hidden;
width: 100%;
height: 40px;
box-sizing: border-box;
text-align: center;
background: #F44A56;
position: relative;
box-shadow: 0px 2px 9px #000;
z-index: 999;
text-decoration: none;
color: #FFF056;
font-family: oswald, arial, sans-serif;
font-size: 13px;
font-weight: bold;
text-shadow: 0px 0px 2px #FFF056;
border-bottom: 1px solid #C9C9CB;
margin: 0px;
box-sizing: border-box;
}
.TW_All_Notifications {
max-width: 997px;
margin: 0px auto;
padding-top: 12px;
box-sizing: border-box;
}
.TW_All_Notifications a {
text-decoration: none;
color: #fff!important;
text-shadow: 0px 0px 2px #242729!important;
font-size: 14px;
}
.TW_Notification_HeadLines {
margin-left: 10px;
}
.TW_Notification_HeadLines a:hover {
text-transform: uppercase;
border-bottom: 1px dotted #FFF056;
}
.TW_Close_Notifications_bar{
position: absolute;
font-size: 20px;
color: #fff;
box-sizing: border-box;
z-index: 999;
right: 15px;
bottom: 12px;
z-index: 7900;
font-weight: bold;
display:block;
}
.TW_Close_Notifications_bar:before{
content: "hide";
font-size: x-small;
position: relative;
top: 10px;
left: 22px;
color: #fff;
cursor: pointer;
text-transform: uppercase;
}
.TW_Opened_Notifications_bar:before{
content: "show";
font-size: x-small;
position: absolute;
top: 30px;
left: 10px;
color: #fff;
cursor: pointer;
text-transform: uppercase;
}
.TW_Opened_Notifications_bar .fa{
position: relative;
top: 5px;
}
.TW_Opened_Notifications_bar{
background: #F44A56!important;
box-shadow: 0px 2px 9px #000;
width: 50px;
height: 45px;
padding: 0px 15px;
box-sizing: border-box;
position: fixed;
z-index: 999999;
top: 0px;
right: 16px;
z-index: 7900;
color: #fff;
box-sizing: border-box;
font-size: 25px;
font-weight: bold;
display: none;
}
Customization:
- The Yellow Highlighted Text is Responsible for the Background Color of the Notification Bar So if you want to Change it just change the values to your desired one.
- The Orange Highlighted Text is Responsible for Color of the Heading Tags If you want to change then replace it.
- The Green Highlighted Text is Responsible For Color of the Anchor tags or links If you want to change then replace it.
Second We Will Add Markup ( HTML):
STEP 1: Go To Template Section As Shown in The Image Below


<body>STEP 3: Copy This Below Code After <body>
<div class='TW_Notification_Wrap' id='TW_Notification_Wrap'>
<div class="TW_Notifications_innerWrap">
<div class="TW_All_Notifications">
<span class="TW_Notification_HeadLines"><i class="fa fa-line-chart" aria-hidden="true"></i> Trending Today: <a class="TW_Notification_text" href='#'>Best Mobiles</a> </span>
<span class="TW_Notification_HeadLines"><i class="fa fa-bullhorn" aria-hidden="true"></i> Announcement: <a class="TW_Notification_text" href='#'>Please Check Our New Page</a> </span>
</div>
<span class='TW_Close_Notifications_bar'><i class="fa fa-arrow-up" aria-hidden="true"></i></span>
</div>
</div>
<span class='TW_Opened_Notifications_bar'><i class="fa fa-arrow-down" aria-hidden="true"></i></span>
Customization:
- The Orange Highlighted Text is responsible for the Heading of your Announcements or Notifications .
- The Green Highlighted Text is Responsible for The URL Of your Posts or any page you want to link to it.
- The Yellow Highlighted Text is for Title of the Post or any page you want to link to it.
Third Part We Will Add JavaScript (JS):
STEP 1: Go To Template Section As Shown in The Image Below


</body>STEP 3: Copy This Below Code Before </body>
<script>
// http://www.trendingwidgets.com/
$(function() {
$(".TW_Close_Notifications_bar").on("click", function() {
$(".TW_Notification_Wrap, .TW_Notifications_innerWrap").slideUp('slow', 'linear', function() {
$(".TW_Opened_Notifications_bar").show();
});
});
$(".TW_Opened_Notifications_bar").on("click", function() {
$(".TW_Opened_Notifications_bar").slideUp('slow', 'linear', function() {
$(".TW_Notification_Wrap, .TW_Notifications_innerWrap").slideDown('slow');
}); }); });
</script>
STEP 4: All Done Save the template And Check it on your Site or Blog.
That's It Thanks For Following our Tutorial '' How To Add Smart Sticky Notification Bar v1.0 in Blogger Blogs? '' Along With us If you found any difficulty Please Comment and Share Your Valuable Opinion. And Stay tuned for More Tutorials Like This and Share this with your friends.


No comments:
Post a Comment