Today we are sharing a simple horizontal Social Media Sharing Buttons for blogger blogs that will be present below every post.
We have added Facebook, Twitter, Pinterest and GooglePlus Sharing Buttons because these social channels are highly crowded.
Social sharing widget is recommended to all bloggers as users after reading can share the articles which they like the most with their friends or family.
The best position for this widget is after the post or below the post title. This widget is very responsive and very fast loading as we have used the modern methods of coding.
These sharing buttons are mobile friendly and beautiful and we have added a hover effect to it. We have used little javascript to change the colours as is very user-friendly to store the colours in a variable comparing to changing the colours in CSS codes repetitively. But if you think that javascript can slow down or any other cross-browser issue then you can add it using CSS.
Now Without wasting time, we will start adding the widget. As blogger still is hard to customize the type of thing for newbies so follow step by step.
Adding The Social Sharing Widget in Blogger Blogs
This has a color theme on the darker side of the spectrum. It is fully responsive and an ideal business theme. It supports parallax, custom backgrounds, multiple sections and theme options panel.First We Will Add The Styling( CSS ):
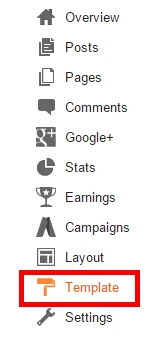
STEP 2: In The Left Side Bar You will find Template Section as highlighted in the image above Click on Template.
STEP 3: Click On Edit HTML.
STEP 4: Press CTRL + F And Search for
<head>
STEP 5: Copy This Below Font-awesome Script after <head>
<link rel="stylesheet" href="https://cdnjs.cloudflare.com/ajax/libs/font-awesome/4.7.0/css/font-awesome.min.css" />
STEP 6: Now Its Time For CSS, Search For
]]></b:skin>
STEP 5: Copy This Below Code Before ]]></b:skin>
/* Start Social Sharing Widget By http://www.allbloggertricks.com */
.ABT_Social_Sharing .ABT_Social_Heading::before {content: "";width: 40%;height: 3px;background: #000;position: absolute;top: 12px;left: 0px;display: block;border-radius: 10px;background: linear-gradient(to right, #4764ad, #38b0f0, rgb(219, 68, 55), rgb(189, 8, 28));}.ABT_Social_Sharing .ABT_Social_Heading::after {content: "";width: 40%;height: 3px;background: #000;position: absolute;top: 12px;right: 0px;display: block;border-radius: 10px;background: linear-gradient(to right, #4764ad, #38b0f0, rgb(219, 68, 55), rgb(189, 8, 28));}.ABT_Social_Sharing .ABT_Social_Heading {position: relative;display: block;padding-bottom: 12px!important;font-size: large;font-family: arial;text-align: center;}.ABT_Social_Sharing > * {margin: 0px!important;padding: 0px;box-sizing: border-box;}.ABT_Social_Sharing {width: 100%;list-style: none;height: 50px;box-sizing: border-box;margin: 20px 0px 0px 0px!important;}.ABT_Social_Sharing ul {list-style: none;width: 100%;}.ABT_Social_Sharing ul li {width: 24%;font-size: 1em;cursor: pointer;color: #fff;display: inline-block;vertical-align: middle;height: 40px!important;border-radius: 4px;}.ABT_Social_Sharing ul li span {font-size: 28px;position: relative;left: 0px;border-right: none;border-radius: 4px;display: block;box-sizing: border-box;float: left;border-bottom-right-radius: 0px;border-top-right-radius: 0px;padding-top: 5px;padding-right: 5px;padding-left: 5px;}.ABT_Social_Share_inner:after {display: table;content: "";clear: both;}.ABT_Social_Sharing ul li a {text-align: right;display: block;float: left;position: relative;right: -2px;font-weight: 600;padding-top: 8px;color: #fff;}.ABT_Social_Sharing ul li:hover {} .ABT_Social_Sharing ul li:hover span i {animation: allbloggertricksTilt .2s infinite;}.ABT_Social_Sharing ul li:nth-child(1), .ABT_Social_Sharing ul li:nth-child(1) span{background: rgb(64,87,149);}.ABT_Social_Sharing ul li:nth-child(2), .ABT_Social_Sharing ul li:nth-child(2) span{background: rgb(0,157,238);}.ABT_Social_Sharing ul li:nth-child(3), .ABT_Social_Sharing ul li:nth-child(3) span{background: rgb(219, 68, 55);}.ABT_Social_Sharing ul li:nth-child(4), .ABT_Social_Sharing ul li:nth-child(4) span{background: rgb(189, 8, 28);}@keyframes allbloggertricksTilt {from {transform: rotate(10deg)}to {transform: rotate(360deg)}}@media (max-width: 600px) {.ABT_Social_Sharing ul li a {font-size: 12px!important;padding-top: 12px!important;}.ABT_Social_Sharing ul li span {font-size: 18px;padding-top: 10px!important;}.ABT_Social_Sharing .ABT_Social_Heading:before,.ABT_Social_Sharing .ABT_Social_Heading:after {width: 30%!important;}}@media (max-width: 790px) {.ABT_Social_Sharing .ABT_Social_Heading:before,.ABT_Social_Sharing .ABT_Social_Heading:after {width: 35%!important;}}@media (max-width: 530px) {.ABT_Social_Sharing .ABT_Social_Heading:before,.ABT_Social_Sharing .ABT_Social_Heading:after {width: 25%!important;top: 8px;}.ABT_Social_Sharing .ABT_Social_Heading {font-size: 14px;}}
/* End Social Sharing Widget By http://www.allbloggertricks.com */
STEP 6: All Done Save the template.
Final Adding Markup And JS:
STEP 1: Go To Template Section As Shown in The Image Below


<data:post.body/>
You Will Find This Code 3 Times or more in your Template So Refer 2nd or 3rd Time.
<b:if cond='data:blog.pageType == "item"'>
<div class='ABT_Social_Sharing'>
<h4><span>Sharing is Caring:</span></h4>
<ul class='ABT_Social_Share_inner'>
<li class='ABT_Social_Buttons'><span class='ABT_Icon_Left'>
<i class='fa fa-facebook-official'/>
</span>
<div class='sharingPlatform'>
<a class='facebook' expr:href='data:post.sharePostUrl + "&target=facebook"' expr:onclick='"window.open(this.href, \"_blank\", \"height=430,width=640\"); return false;"' expr:title='data:top.shareToFacebookMsg' rel='nofollow' target='_blank'>
</a>
</div>
</li>
<li class='ABT_Social_Buttons'><span class='ABT_Icon_Left'><i class=' fa fa-twitter-square'/></span>
<div class='sharingPlatform'>
<a class='twitter' expr:href='data:post.sharePostUrl + "&target=twitter"' expr:title='data:top.shareToTwitterMsg' rel='nofollow' target='_blank'>
</a>
</div>
</li>
<li class='ABT_Social_Buttons'><span class='ABT_Icon_Left'>
<i class='fa fa-google-plus-square'/>
</span>
<div class='sharingPlatform'>
<a class='google' expr:href='"https://plus.google.com/share?url=" + data:post.url' onclick='javascript:window.open(this.href, "", "menubar=no,toolbar=no,resizable=yes,scrollbars=yes,height=600,width=600");return false;' rel='nofollow' title='Share this on Google+'>
Google+
</a>
</div>
</li>
<li class='ABT_Social_Buttons'>
<span class='ABT_Icon_Left'>
<i class='fa fa-pinterest-square'/>
</span>
<div class='sharingPlatform'>
<a class='pinterest' expr:href='" http://pinterest.com/pin/create/button/?url=" + data:post.url + " & media=" + data:post.thumbnailUrl + " & description=" + data:post.title' rel='nofollow' target='_blank' title='Share This on Pinterest'>
</a>
</div>
</li>
</ul>
</div>
<div style='clear: both;' />
</b:if>
STEP 4: All done save the template and Open Your Post and Scroll Down To The End To See This Widget Working.
Conclusion:
Finally, we come to the conclusion still adding scripts in blogger template is not like a piece of cake for newbies so blogger should update its template and make it more user-friendly like WordPress.
So If you added the script correctly then congratulations soon you will become developer :p and those who have found problems in adding it, please comment below and we will help you in adding the script to your blogs free :p
If you have any suggestions for optimizing or customizing this widget then comment or contact us we will update the widget for you.
That's It Thanks For Following our Tutorial '' Add Cute Social Sharing Buttons Below Every Post on Blogger Blogs '' Along With us If you found any difficulty Please Comment and Share Your Valuable Opinion. And Stay tuned for More Tutorials Like This and Share this with your friends.


Usually I never comment on Blogs but your article is so convincing that I never stop myself to say something about it. You’re doing a great job Man,Keep it up.
ReplyDelete