
Live Demo
Everyone wants a sticky Floating bar for their blog where they can show the latest announcements or changes they made in blog, blog posts, privacy policy, or to highlight some important posts. you can also say your users to follow you on social networking sites.
We have created this Sticky Floating bar with toggle feature where your users can show or hide this sticky bar according to their desire.
Floating Sticky Bar is is recommended because this sticky widget will be at fixed position at the top of your blog where this widget will get maximum exposure. Like we said above you can show so many things inside this sticky bar. This widget will be full width and has a hide and show feature called toggle. Using this widget you can increase your pageviews. You can take users to your most important post or page.
The Design is cool and theme used is dark to bring the premium look to the widget. This theme looks good in light theme blog and dark themes blogs as well. You can customized the colors with few tweaks and can add your favorite colors that match your blog theme.
Everyone wants a sticky Floating bar for their blog where they can show the latest announcements or changes they made in blog, blog posts, privacy policy, or to highlight some important posts. you can also say your users to follow you on social networking sites.
We have created this Sticky Floating bar with toggle feature where your users can show or hide this sticky bar according to their desire.
Floating Sticky Bar is is recommended because this sticky widget will be at fixed position at the top of your blog where this widget will get maximum exposure. Like we said above you can show so many things inside this sticky bar. This widget will be full width and has a hide and show feature called toggle. Using this widget you can increase your pageviews. You can take users to your most important post or page.
Features of Sticky Floating Bar Fixed at top in blogger blogs hide button:
Toggle Feature:
We have added toggle button at the right side of the widget so that users can hide and show the fixed floating bar based on their choice. When visitors clicked on UP Arrow the widget will hide and instantly the down arrow will appear and when click on it the widget will display again.

Less Impact on Loading Speed of your Blog:
We have used very less JavaScript so widget will load fast. And It will not impact much on the loading speed of your blog.
Design & Color Theme:
Installation of Widget:
We know some of you are still not familiar with the codes in the blog templates and don't want to their hand to get dirty. So we have made this widget easy to install. you can add this widget like you add blogger third party widgets from the layout section.
ChangeLog for Recommended Post For You Widget:
- Added Toggle Functionality.
We Checked in Many Templates This Widget Works Very Smoothly and loads very fast.
Adding This Widget is very easy in less than one minute you can add this widget in your blog.
Adding The Widget in the Blog:
STEP 1: Log in to your Blogger account and Go to your Blogger Dashboard

STEP 2: In The Left Side Bar You will find Layout Section as highlighted in the image above Click on Layout.

STEP 3: Click On "Add a Gadget" As highlighted in the image above.
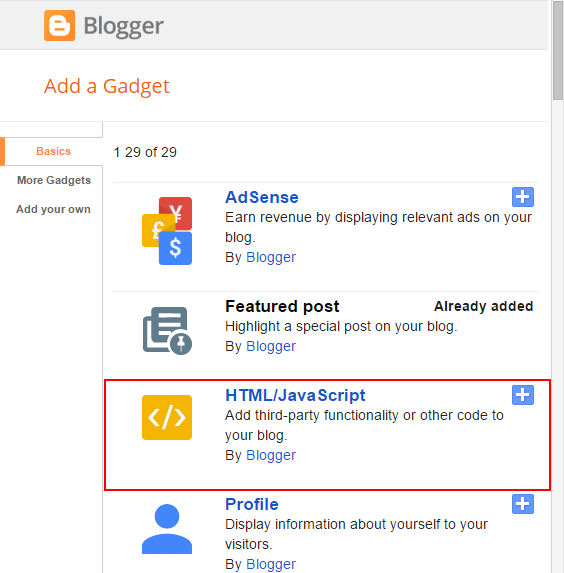
STEP 4: After Clicking on "Add a Gadget" Choose "HTML/JavaScript" from the list & as highlighted in the image above.
STEP 5: Now Copy This Below Code And Paste it in The Empty Box of the "HTML/JavaScript" Section.
If you have already added Font-awesome link and JQuery script in your blog then don't add this two scripts highlighted in orange color.
<link rel="stylesheet" href="https://cdnjs.cloudflare.com/ajax/libs/font-awesome/4.7.0/css/font-awesome.min.css"/>
<script src="https://cdnjs.cloudflare.com/ajax/libs/jquery/3.2.1/jquery.min.js"></script>
<style>
*{
margin:0px;
padding:0px;
box-sizing: border-box;
}
:root{
--AllBloggerTricks_BG_Color: #000;
--ABT_Font_Color: #FFF;
}
#ABT_Notification_Wrap {
min-width: 100%;
max-width: 100%;
margin:0px!important;
position:fixed;
top:0px;
left:0px;
width:100%;
z-index:100;
text-align: center;
min-height: 45px;
max-height:45px;
overflow: hidden;
background-color: var(--AllBloggerTricks_BG_Color);
box-shadow: 1px 2px 9px #1B1B1B;
border-bottom: 2px solid #1B1B1B;
}
.ABT_Notifications_innerWrap {
text-decoration: none;
color: #FFF056;
font-family: oswald, arial, sans-serif;
font-size: 13px;
font-weight: bold;
margin-top: 14px;
position: relative;
}
.ABT_All_Notifications{
margin-left: 80px;
margin-right: 80px;
}
.ABT_All_Notifications a {
text-decoration: none;
color: var(--ABT_Font_Color)!important;
text-shadow: 0px 0px 2px #242729!important;
font-size: 14px;
}
.ABT_Notification_HeadLines {
margin-left: 10px;
}
.ABT_Notification_HeadLines a:hover {
border-bottom: 1px dotted #FFF056;
}
#button {
position: fixed;
top: 0px;
right: 15px;
z-index: 999999999999;
font-size: 25px;
color: var(--ABT_Font_Color);
cursor: pointer;
padding: 10px 10px;
min-height: 40px;
max-height:40px;
width: 40px;
}
#ABT_Brand {
position: fixed;
top: 1px;
left: 10px;
z-index: 999999999999;
font-size: 19px;
color: var(--ABT_Font_Color);
cursor: pointer;
padding: 10px 10px;
min-height: 40px;
max-height:40px;
opacity: 0.4;
}
#ABT_Brand a{
color: var(--ABT_Font_Color);
text-decoration: none;
font-weight: bold;
}
#ABT_Brand:hover{
opacity: 1;
}
.open{
overflow: hidden;
background: var(--AllBloggerTricks_BG_Color);
min-height: 40px;
max-height:40px;
border:unset!important;
position: fixed;
top: 0px;
right: 15px;
border-left: 2px solid #1B1B1B;
border-right: 2px solid #1B1B1B;
cursor: pointer;
width: 40px;
z-index: 999999999999;
font-size: 25px!important;
border-radius: 0px 0px 5px 5px;
box-shadow: 1px 2px 9px #1B1B1B;
border-bottom: 2px solid #1B1B1B;
padding: 8px 8px;
color: var(--ABT_Font_Color);
}
</style>
<span id='button' class='fa fa-arrow-up' aria-hidden='true'></span>
<div class='ABT_Notification_Wrap' id='ABT_Notification_Wrap'>
<span id='ABT_Brand'><a href='http://www.allbloggertricks.com/' title='All Blogger Tricks'>ABT</a></span>
<div class="ABT_Notifications_innerWrap">
<div class="ABT_All_Notifications">
<span class="ABT_Notification_HeadLines">
<i class="fa fa-line-chart" aria-hidden="true"></i> Trending Today: <a class="ABT_Notification_text" href='http://www.allbloggertricks.com/2017/09/18-most-valuable-google-chrome-addons.html'>18 Most Valuable Google Chrome Extensions</a>
</span>
<span class="ABT_Notification_HeadLines"><i class="fa fa-bullhorn" aria-hidden="true"></i> Announcement: <a class="ABT_Notification_text" href='#'>Like Us On Facebook</a> </span>
</div>
</div>
</div>
<script type='text/javascript'>
$(function() {
$('#button').click(function(e) {
if ($('#ABT_Notification_Wrap').is(':visible')) {
$(this).removeAttr("id").removeClass("fa fa-arrow-down").addClass("open fa fa-arrow-down");
$('#ABT_Notification_Wrap').fadeToggle();
} else {
$(this).attr("id", "button").removeClass("open fa fa-arrow-down").addClass("fa fa-arrow-up");
$('#ABT_Notification_Wrap').fadeToggle();
}
});
});
</script>
That's it Thanks For Following The Tutorial Now Its time For Customization to make it as it made for your site.
Customization:
- The Orange Highlighted Text is responsible for Font-awesome Style-sheet and Jquery Scripts if you already included this style-sheet and script in your blog template then please don't add this both in your blog .
- The Green Highlighted Text is Responsible for Background Color of the Floating Sticky bar and toggle button. Replace this with your desired color to change the theme.
- The Light-blue Highlighted Text is Responsible For Font Color or Text Color of the Floating Sticky bar change this to your desired color.
Changing The Main Notifications and Announcements:
- The Lightblue Highlighted Text is Responsible For The Link to your desired post or page.
- The Red Color Text is Responsible for The Link Anchor Text.
Yo can add more links in the Sticky bar if you want to add more links then add this code after the end of </a>.
<a class="ABT_Notification_text" href='http://www.allbloggertricks.com/2017/09/18-most-valuable-google-chrome-addons.html'>
Your Text
</a>
You also can add your own section by removing our default section.
Just add the below code if you want to add one more section then change according to your need
<span class="ABT_Notification_HeadLines"><i class="fa fa-bullhorn" aria-hidden="true"></i> Your Heading:
<a class="ABT_Notification_text" href='#your-blog-link-here'>
Like Us On Facebook
</a>
</span>
STEP 6: All Done Save the Gadget and Check it in your blog.
Conclusion:
We finally added the widget now its time to check and edit the widget according to the need. If you are confused in add links or separate section the comment below we will help you.
And those who have added this widget successfully without any hurdles congrats to them. and if you want any styling or improvement notify us we will try to add it for you.
And those who have added this widget successfully without any hurdles congrats to them. and if you want any styling or improvement notify us we will try to add it for you.
That's It Thanks For Following our Tutorial '' How To Create Sticky Floating Bar Fixed at top in blogger blogs? '' Along With us If you found any difficulty Please Comment and Share Your Valuable Opinion. And Stay tuned for More Tutorials Like This and Share this with your friends.
Incoming Search Terms:
Incoming Search Terms:


Thanks, very helpful
ReplyDeleteWelcome. Share this post with your friends and help us to create more like this
DeleteThere is something I would like to ask and hope you'd answer. I have added this to my blog but the floating bar covers my site's top menu. Is there a way to toggle this widget to push the webpage below it? So it would not cover my top menu?
ReplyDeleteHello What you need to do is get the id of the top menu and just add margin-top: 60px hope this will solve the problem.
Delete