How To Add Responsive Widget - Show Latest Posts Ticker with labels in Blogger

Learning About Latest Posts Ticker with labels in Blogger?
Hello Everyone We Are Back With One Of The Best And Responsive News Ticker Which Displays Your Most Recent Posts In News Headlines Form. This Widget Latest Posts Ticker is Created Using Json For Fetching Your Posts And Animation is Done By Using Jquery (a Javascript Framework).
The Most Special Part About This Latest Posts Ticker is It Shows The First Label Of Your Post And It Has Options Like Next, Previous Buttons And Pause And Play Option Too.
What is Latest Posts Ticker with labels in Blogger?
Latest Posts Ticker Works On JSON And Fetches The Most Recent Posts. This Widget Is Responsive And It Is Evolve From The News Sites Where They Have Lot Of Breaking News To Display So What They Do Is They Will Create A Widget Like This And Display Recent Posts Titles Along With Its Category Like Entertainment, Technology, Gadgets Etc.
We Have Created Similar Latest Posts Ticker Widget For Blogger Blogs. It Can Be Customized And Have Unlimited Colors Options So That This Widget Will Fixed To Your Sites Theme.
We Have Created Similar Latest Posts Ticker Widget For Blogger Blogs. It Can Be Customized And Have Unlimited Colors Options So That This Widget Will Fixed To Your Sites Theme.
Why To Use Latest Posts Ticker with labels in Blogger?
Latest Posts Ticker With Labels In Blogger Is Recommended Because If You Receive Organic Traffic From Search Engines Then Your Viewer Will Not Be Able To See The Latest Posts Of Your Site Then If You Have This Latest Posts Ticker Then This Will Look More Official And Visitors Can See Your Recent Posts This Will Increase Your Pageviews And Decrease Your Site Bounce-Rate Hence This Will Improve SEO Of Your Blog.
Check The Live Demo:
See The GIF Demo Below. Don't Refer this Image is Low Quality To show the Animation effect we added it:
Let's Add Latest Posts Ticker:
Let Start! How To Add Responsive Widget - Show Latest Posts Ticker with labels in Blogger:
STEP 1: Log in to your Blogger account and Go to your Blogger Dashboard

STEP 2: In The Left Side Bar You will find Layout Section as highlighted in the image above Click on Layout.

STEP 3: Click On "Add a Gadget" As highlighted in the image above.
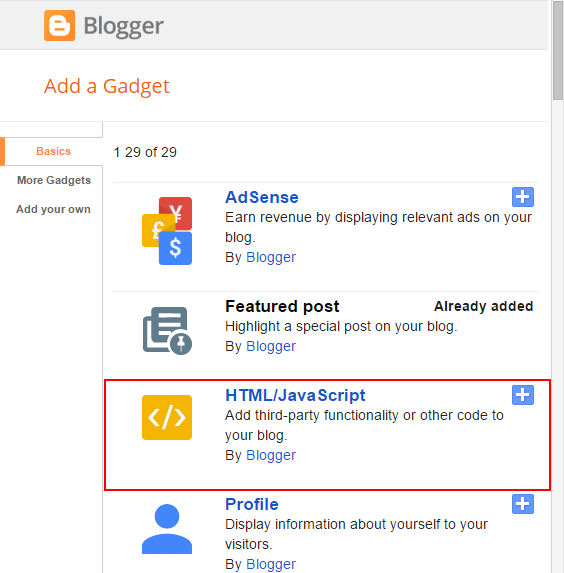
STEP 4:After Clicking on "Add a Gadget" Choose "HTML/JavaScript" from the list & as highlighted in the image above.
STEP 5: Now Copy This Below Code And Paste it in The Empty Box of the "HTML/JavaScript" Section.
<link rel='stylesheet' href='https://cdn.rawgit.com/mmnauman/allbloggertricks-files/2fbf85d4/recentPostsStyles.css'/>
<style>
#latest_posts .meta-tags a{color: #F44A56 !important ;}
#latest_posts{border: solid #F44A56 !important;}
#latest_posts .newsTickerHeadWrap span{border-left-color: #F44A56 !important;}
#latest_posts .newsTickerHeadWrap{background-color: #F44A56 !important}
#latest_posts .meta-tags a, #latest_posts .newsTickerHeadWrap, #latest_posts .slides h3 a{
font-size: 12px; }
</style>
<div id='latest_posts'>
<div class='newsTickerHeadWrap'>
<h2 id="main-heading"><i class="fa fa-fire" aria-hidden="true"></i>
Breaking News:
</h2>
<span></span>
</div>
<div class="directionsBtn">
<i class="fa fa-arrow-left" id='previous' aria-hidden="true"></i>
<i class="fa fa-pause" id='pauseTicker' aria-hidden="true"></i>
<i style='display:none' class="fa fa-play" id='playTicker' aria-hidden="true"></i>
<i class="fa fa-arrow-right next" id='next' aria-hidden="true"></i>
</div>
<ul id='latest_posts_list'>
</ul>
</div>
<script src='https://cdn.rawgit.com/mmnauman/allbloggertricks-files/40616f77/recentPostsWidget.js'></script>
<script>
var blogLink = document.location.origin;
var callScript = document.createElement("script");
callScript.src = blogLink+"/feeds/posts/default?alt=json-in-script&callback=trendingWidgets";
var latest_posts = document.getElementsByTagName('body')[0];
latest_posts.appendChild(callScript);
</script>
That's it Thanks For Following The Tutorial Now Its time For Customization to make it as it made for your site.
Customization:
First CSS Part:
- The Light-blue Highlighted Text is Responsible For The Color Theme of Latest Posts Ticker So you can change the Hexa- Decimal Color Values to your Desired color name or value (Use Dark Colors).
Use Dark Colors & You can use Color Name like Red, Blue or RGB Colors instead of Hexa-Decimal value.
Second HTML Part:
- The Orange Highlighted Text is Responsible For Font Size of the Posts and Categories So Change it according to your desire. Play with it till you get your best one.
- The Yellow Highlighted Text is Responsible For Heading of the Ticker You can change it and replace it with your desired heading.
STEP 6: All Done Save the Gadget and Check it in your site.
That's It Thanks For Following our Tutorial '' Responsive Widget - Show Latest Posts Ticker with labels in Blogger '' Along With us If you found any difficulty Please Comment and Share Your Valuable Opinion. And Stay tuned for More Tutorials Like This and Share this with your friends.
That's It Thanks For Following our Tutorial '' Responsive Widget - Show Latest Posts Ticker with labels in Blogger '' Along With us If you found any difficulty Please Comment and Share Your Valuable Opinion. And Stay tuned for More Tutorials Like This and Share this with your friends.


No comments:
Post a Comment