Hello everyone today's tutorial is about Auto Hide / Remove Quick Edit / Wrench Icons in Blogger blogs. This is Optional Tutorial For Webmasters As Blogger By Default Added this Quick Edit Icon Below Every Widget To Make Webmasters Work Easier as They can edit any widget directly from their site instead of Going to layout and then finding that widget and editing. But This is a small image icon and most webmasters used minimum more than 3 widgets in their blog. So imagine a Small image has to render more than 3 times and this image icon is missing ALT And Titles. So For SEO Purpose you should Remove it.

Why To Remove Quick Edit / Wrench Icons?
As you know Blogger By default Added it to every template. So This is an 18px Square PNG Image With ALT And Title Tags Missing which is very bad for SEO. And This quick edit icon is shown only to admin but it renders when user request any page just it does not Display. Although invisible to the user they increase load time with each icon sending an extra http load request. Loading time is very important factor for SEO For Example See our Competitors are ranked better than us if they are 1 second faster than us.Thus you should remove it if you doesn't use it.
Removing it Breaks my Blog Widgets?
Not There is no relation between your widget and this Quick edit Icon just it is placed below your widget and added link to your widget that can be visited if you are logged in with your admin account. So don't get confused and remove it if you want and it does not Breaks your blog widgets.
Let Start! How To Remove Quick Edit in Blogs or sites:
Steps To Hide / Remove Quick Edit / Wrench Icons:
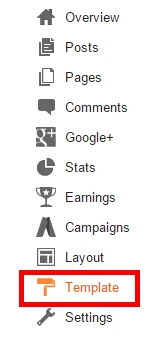
STEP 2: In The Left Side Bar You will find Template Section as highlighted in the image above Click on Template.
STEP 3: Click On Edit HTML.
STEP 4: After Clicking on Edit HTML Search for
<b:include name='quickedit'/>
STEP 5: You will find this Many times. Delete all instances to remove quick edit completely.
STEP 6: All Done Save Your Template and Verify it in your site Whether it is working correctly or not . If it is not working correctly then you did some mistake while following tutorial.
2 Method To Hide quick edit by using CSS:
STEP 2: In The Left Side Bar You will find Template Section as highlighted in the image above Click on Template.
STEP 3: Click On Edit HTML.
STEP 4: After Clicking on Edit HTML Search for
]]></b:skin>
STEP 5: Copy This Below Code Before ]]></b:skin>
.quickedit{display:none;}
STEP 6: All Done Save Your Template and Verify it in your site Whether it is working correctly or not . If it is not working correctly then you did some mistake while following tutorial.
That's It Thanks For Following our Tutorial " Auto Hide / Remove Quick Edit / Wrench Icons in Blogger blogs! '' Along With us If you found any difficulty Please Comment and Share Your Valuable Opinion. And Stay tuned for More Tutorials Like This and Share this with your friends.


well shared, Nice article ..i have also wrote an article about this on my blog : Ollupdate you can check it too thanks.
ReplyDelete