What is a Widget Container In Blogger?
Widget Container The Name Itself is showing that it carries widgets. This is a Blogger Default Feature which we need to activate by installing the script where ever we want to display the Widget Container. When You activate this you will be able to use in blogger layout section there you can add any widget inside this area whether it is blogger default widgets or your own customized widget or Ads Code.
Why To Use New Widget Container ?
Custom Widget Container Can Be Used When you are facing this following Problems.
- You want a Different Section To Show Advertisements
- You want a Different Place to show Ads Or Widgets
- You want to add the ads or widgets below the header but you don't have any widget area there then add one there.
- you want to add a full width widget above footer then add this section.
Check This Widget Also: CSS3 Popular Posts Widget with Auto Numbers+hover effect!
Let Start! How To Add New Widget Container in Blogger layout:
First We Will Add Some Styling ( CSS ):
]]></b:skin>
STEP 5: Copy This Below Code Before ]]></b:skin>
#TW_Container_Wrap h2{
font-weight: bold;
border-bottom: 2px solid #70BA3D;
padding-left: 5px;
position: relative; }
#TW_Container_Wrap h2:before{
width: 65%;
background: #00A2E8;
height: 2px;
position: absolute;
bottom: -2px;
content: "";
left: 0px; }
.tw_widget{
width: 100%;
text-align: center;
}
Customization:
- The Yellow Highlighted Text is for The Widget Title In Most blogs the Widgets Title Will be h2 But If you use h3 Don't worry just change or replace h2 with h3.
- The Orange Highlighted Text is for The Widget Width By Default it is 100% so change this with your preferred width if you are using px please use px after the number otherwise it will be in percent.
STEP 6: All Done Save the template.
Second Part We Will Activate the Widget Container:
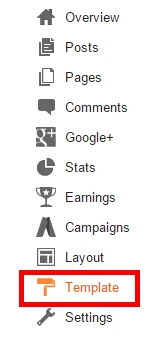
STEP 2: In The Left Side Bar You will find Template Section as highlighted in the image above Click on Template.
STEP 3: Click On Edit HTML.
STEP 4: After Clicking on Edit HTML Now Search for your preferred location where you want the widget area to
show in the site.
show in the site.
STEP 5: Copy This Below Code Before Your Desired Location
<div id='TW_Container_Wrap' class='TW_Container_Wrap'>
<b:section class='tw_widget' id='tw_widget'/>
</div>
Customization:
- The Green Highlighted Text is for the Classes If you want to use your default class then don't replace just add your class keeping the existing class.
STEP 6: All Done Save Your Temple & Check it in your site.
That's It Thanks For Following our Tutorial '' How to add a New Widget Container in Blogger layout (For Ads) ? '' Along With us If you found any difficulty Please Comment and Share Your Valuable Opinion. And Stay tuned for More Tutorials Like This and Share this with your friends.


No comments:
Post a Comment