
What is Recent Comments Widget?
Recent Comments Widget Fetches Your Most Recent Comments With Nice Users Avatars And Comments Excerpts. With User Name.
Why To Use Recent Comments Widget?
Recent Comments Widget is recommended Because This Widget Encourage More Users To Comment And This Will Improve the Site Credibility. As The Interaction between Author and The Reader Increases.
See The GIF Demo Below After the tutorial you will get this Widget:

Let Start! How To Add Recent Comments Widget in our Blog:
Steps To Add Recent Comments Widget:
STEP 1: Log in to your Blogger account and Go to your Blogger Dashboard

STEP 2: In The Left Side Bar You will find Layout Section as highlighted in the image above Click on Layout.

STEP 3: Click On "Add a Gadget" As highlighted in the image above.
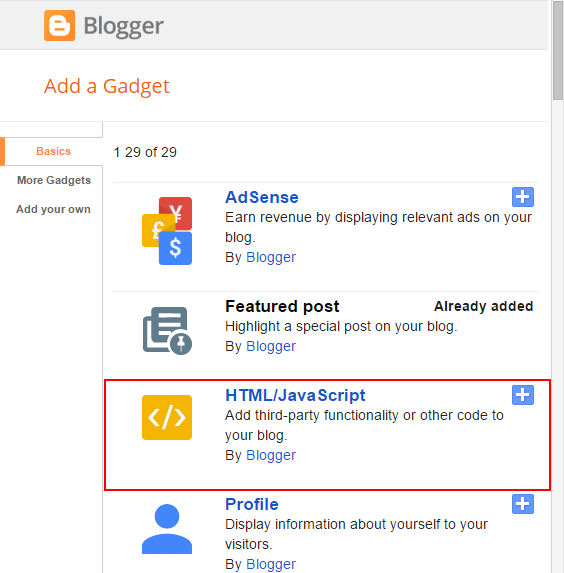
STEP 4:After Clicking on "Add a Gadget" Choose "HTML/JavaScript" from the list
STEP 5: Now Copy This Below Code And Paste it in The Empty Box of the "HTML/JavaScript" Section.
<style type="text/css">
/* Recent Comments Decorated by http://www.trendingwidgets.com */
.recentCommentsWrap{text-align: left; width: 100%; height: 100%; font-size: 120%;}.recentCommentsWrap li{ background-color: rgba(0,0,0, 0.3); border-radius: 10px; list-style: none; font-family: 'Bree Serif', serif;}.footer-outer {margin: 5px 2px 8px 2px !important;font-size: 95%;display: block;float: right;color: grey;}.kmtrimg {width: 60px;height: 60px;display: block;float: left;margin-right: 10px;}.recentCommentsWrap li {padding: 10px 10px 30px 10px;margin-top: 2px;border-bottom: 1px dotted #000;}.kmtrimg img {display: block;width: 100%;height: 100%;}.recentCommentsWrap li:hover a.thumrc img{opacity: 0.5;}.recentCommentsWrap li:hover {-moz-transition: all 0.5s ease-out;-o-transition: all 0.5s ease-out;-webkit-transition: all 0.5s ease-out;-ms-transition: all 0.5s ease-out;transition: all 0.5s ease-out; -moz-transform: rotate(7deg);-o-transform: rotate(7deg);-webkit-transform: rotate(7deg);-ms-transform: rotate(7deg);transform: rotate(7deg);}.ketkomt span{ display: block; color: grey; text-align: left;}.ketkomt span:before {content: "\f075";font-family: FontAwesome;font-style: normal;font-weight: normal;text-decoration: inherit;color: #fff;padding-right: 0.5em;text-align: right;font-size: 20px;}
</style>
<div class='recentCommentsWrap'><script type='text/javascript'>//<![CDATA[var numposts = 5, cmtext = "Comments", pkBlank = "https://blogger.googleusercontent.com/img/b/R29vZ2xl/AVvXsEi3QfTBsACHL6uoaLAd883kqvRFa79tD-ayidYbXd5PbljRzXhYrkNWrbTCKfvdLeLLa7Lj0bAbPp3rjdrzmdTFkXTXTsFlQQtRCRmGrGaQz59xhKgHSDtIDMtQXVox5kCCXkcvLHdYxz2z/s50/user-anonymous-icon.png", numcomment = 5, cmsumm = 100;//]]></script><script type="text/javascript" src="https://mytopdownloads.com/Trending%20Widgets/recentCommentsPosts.js"></script><script src='/feeds/comments/default?alt=json-in-script&callback=dropdowncomment'></script></div>
Customization:
- The Yellow Highlighted Text is for Number of Comments To Display By Default 5 Comments Will Be Displayed If You Want More Then Change This .
- The Green Highlighted Text is Responsible For The Length of Comment Summary or Excerpts. If You Want More or Less Change this Parameter
- The light blue Highlighted Text is Responsible For Comment Avatar If No Image is Found Then This Default Image Will Be Displayed If you want To Change Default Avatar Then Change This And Have Fun.
STEP 6: All Done Save the Gadget and Check it in your site.
That's It Thanks For Following our Tutorial 'Add CSS3 Transparent Recent Comments Widget To Blogger! '' Along With us If you found any difficulty Please Comment and Share Your Valuable Opinion. And Stay tuned for More Tutorials Like This and Share this with your friends.


No comments:
Post a Comment