How To Add Best 3 Columns Footer Widget Section in Blogger Theme?

Hello Friends we are back with another useful widget where we will teach you how to add footer section in your blogger layout. Three Columns footer will make your blog look more professional and attractive.
This Footer section will be visible in your layout so that you can add or remove widgets. Footer Section covers the full width and This section has dark theme with moveover effect on Titles.
After few tweaks this footer section can fit to any template and will not affect on your blog loading speed as we have not used JavaScript or other frameworks. We used HTML for markup and CSS For Styling.
This Three Columns Footer will stacked side by side in your blog layout. Many big sites used this type of footer in their site you can add About us, Contributors, Alexa Rank, Recent Posts etc widgets in this section.
First We Add Footer Styling ( CSS ):
STEP 1: Log in to your Blogger account and Go to your Blogger Dashboard

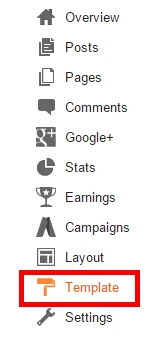
STEP 2: In The Left Side Bar You will find Template Section as highlighted in the image above Click on Template.
STEP 3: Click On Edit HTML.
STEP 4: After Clicking on Edit HTML Search for
]]></b:skin>

STEP 5: Copy This Below Code Before ]]></b:skin>
/* Footer Decorated By http://www.allbloggertricks.com */
footer#ABT_Footer_Wrap{ margin: 0px!important; padding:15px 0!important; min-width:100%!important; background: rgb(34,34,34)!important;} #ABT_Footer_Inner-Wrapper{ max-width: 1150px!important; margin: 0 auto!important; } .ABT_Footer-Tabs{ width: 31%!important; float: left!important; text-align: left; } .ABT_Footer_Stylings h2{ background: none!important; color: #fff!important; font-size: 14px!important; margin-bottom: 30px!important; text-transform: uppercase!important; letter-spacing: 1px!important; overflow: hidden!important; padding-left: 15px!important; position: relative!important; } .ABT_Footer_Stylings h2:before{ content: ''!important; width: 5px!important; position: absolute!important; background-color: rgb(221,47,47)!important; border-radius: 5px!important; height: 100%!important; left: 0!important; z-index: 8!important; } .ABT_Footer_Stylings h2:after{ content: ''!important; background-color: #2F2D2D!important; height: 1px!important; width: 100%!important; position: absolute!important; top: 50%!important; margin-top: -1px!important; margin-left: 8px!important; } .ABT_Footer_Stylings h2:hover:before { background-color: #7ee0b3!important; } .ABT_Footer_Stylings h2:hover:after{ background-color: #7ee0b3!important;} #ABT_Footer_Stylings2{margin: 0 3.5%}.ABT_Footer_Stylings{color: #fff;}
Customization:
- The Yellow Highlighted Text is responsible for the Background Color of the Footer Tabs So if you want to Change it just change the values to your desired one.
- The Orange Highlighted Text is Responsible for maximum width of the footer by default we have added 1150px but you can change it to your desired width.
- The Green Highlighted Text is for The Widget Title In Most blogs the Widgets Title Will be h2 But If you use h3 Don't worry just change or replace h2 with h3.
STEP 6: All Done Save the template.
Second We Will Add Some Styling ( HTML):
STEP 1: Go To Template Section As Shown in The Image Below
</body>STEP 3: Copy This Below Code Before </body>
<footer id='ABT_Footer_Wrap'>
<div id='ABT_Footer_Inner-Wrapper' class='row'>
<div class='ABT_Footer-Tabs col-sm-4' id='ABT_Footer_Tab_1' style='margin: 0px!important;'>
<div class='ABT_Footer_Stylings' id='ABT_Footer_Stylings1'>
<b:section class='ABT_Footer_Widget_Wrap' id='ABT_Footer_Widget_Wrap1' preferred='yes'></b:section>
</div>
</div>
<div class='ABT_Footer-Tabs col-sm-4' id='ABT_Footer_Tab_2'>
<div class='ABT_Footer_Stylings' id='ABT_Footer_Stylings2'>
<b:section class='ABT_Footer_Widget_Wrap' id='ABT_Footer_Widget_Wrap2' preferred='yes'></b:section>
</div>
</div>
<div class='ABT_Footer-Tabs col-sm-4' id='ABT_Footer_Tab_3'>
<div class='ABT_Footer_Stylings' id='ABT_Footer_Stylings3'>
<b:section class='ABT_Footer_Widget_Wrap' id='ABT_Footer_Widget_Wrap3' preferred='yes'></b:section>
</div>
</div>
<div style='clear: both'></div>
</div>
</footer>
STEP 4: All Done Save the template And Check it in your Blog Layout.
Conclusion:
Finally we have added three columns footer section. If you are not able to add then don't hesitate to ask us we will help you. And If you added but not fitting to your template then comment we will fix it.
And those who have added successfully without any hurdles congrats to them. and if you want any styling in this footer notify us we will add it for you.
And those who have added successfully without any hurdles congrats to them. and if you want any styling in this footer notify us we will add it for you.
That's It Thanks For Following our Tutorial '' Add 3 Columns Footer For Widgets in Blogger Layout '' Along With us If you found any difficulty Please Comment and Share Your Valuable Opinion. And Stay tuned for More Tutorials Like This and Share this with your friends.


No comments:
Post a Comment