
What is Grid Style Recent Posts v2.0 Widget?
Grid Style Recent Posts v2.0 Fetches Your Most Recent Posts With Posts Thumbnails only and on hover Display Title of the Posts which looks beautiful and can be customized according to your desires or websites Themes. this is light weight and Can be Place above footer in full width space or below header. Created By JSON Script And Decorated by using CSS.
Why To Use Grid Style Recent Posts v2.0 Widget?
Grid Style Recent Posts v2.0 is recommended Because it is lightweight as I said above and Looks Official. This Widget is Inspired by Wordpress. And With a few tweaks this widget will become responsive.
when the visitors comes from Search engines to a particular post they don't know what is new in the site. if Recent Posts Widget will be there there will be more Page views, internal linking and low bounce-rate if this is there then it is good for SEO.
See The GIF Demo Below After the tutorial you will get this Widget:

Let Start! How To Add Grid Style Recent Posts v2.0 in Blogs or sites:
Before Starting this Tutorial Please Make Sure You Added This Code Before </body> in your Template This is Very Important Step. Follow This Tutorial Fix/Improve Thumbnail Resolution in all Blogger Widgets
Steps To Add Grid Style Recent Posts v2.0 Widget:
STEP 1: Log in to your Blogger account and Go to your Blogger Dashboard

STEP 2: In The Left Side Bar You will find Layout Section as highlighted in the image above Click on Layout.

STEP 3: Click On "Add a Gadget" As highlighted in the image above.
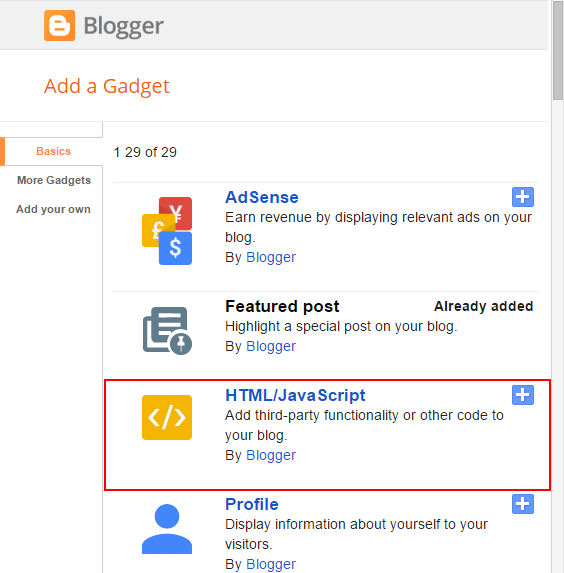
STEP 4:After Clicking on "Add a Gadget" Choose "HTML/JavaScript" from the list
STEP 5: Now Copy This Below Code And Paste it in The Empty Box of the "HTML/JavaScript" Section.
That's It Thanks For Following our Tutorial 'Grid Style Recent Posts v2.0 on hover display title in blogger '' Along With us If you found any difficulty Please Comment and Share Your Valuable Opinion. And Stay tuned for More Tutorials Like This and Share this with your friends.
<!--Grid Style Recent Posts with hover effect by trendingwidgets.com --><style type="text/css">
.recent_label_with_thumbs li{display:inline-block;list-style:none;width:180px;float:left;text-align:left;margin-right: 5px; position:relative;}.recent_label_with_thumbs li strong{padding:2px!important; margin:0!important; display:none;list-style:none;float:left;text-align:center;width:98%;font-size:1em; background-color: rgba(0,0,0,0.5); position:absolute; bottom:0.30em;left:2px; color:gold;border-radius:0px 0px 10px 10px;overflow:hidden; word-wrap: break-word}.recent_label_with_thumbs li strong a{color: gold; width:100%;display:block;}.recent_label_with_thumbs img{box-shadow: 0px 0px 5px 2px #2c2c2c inset;padding: 2px;width: 100%;height:100%;border-radius:10px;}.recent_label_with_thumbs span .clearfix:hover strong { display:block;}.recent_label_with_thumbs > span{ display:inline-block!important;}.recent_label_with_thumbs img:hover{ box-shadow: 0px 0px 8px 2px gold inset;}
</style><script src="https://mytopdownloads.com/Trending%20Widgets/recent_posts.js"></script>
<script type='text/javascript'>var numposts = 4;var showpostthumbnails = true;var displaymore = false;var displayseparator = false;var showcommentnum = false;var showpostdate = false;var showpostsummary = false;var numchars = 80;</script> <script type="text/javascript" src="/feeds/posts/default?orderby=published&alt=json-in-script&callback=recentPosts"></script>
Customization:
- The Yellow Highlighted Text is Responsible for Width of Thumbnails if you want to increase or decrease just change the parameter and play with this till you get your Desired Width.
- The Green Highlighted Text is Responsible For Number of Posts To Display By Default 4 Posts Will Be Displayed If You Want More Then Change This Green Text with your desired Number.
STEP 6: All Done Save the Gadget and Check it in your site.
Now We Will Add JavaScript to Improve Thumbnail Quality
STEP 1: Log in to your Blogger account and Go to your Blogger Dashboard

STEP 2: In The Left Side Bar You will find Template Section as highlighted in the image above Click on Template.
STEP 3: Click On Edit HTML.
STEP 4: After Clicking on Edit HTML Search for
</body>
STEP 5: Copy This Below Code Before </body>
<script type='text/javascript'> function changeThumbSize(id,size){var blogGadget = document.getElementById(id);var replacement = blogGadget.innerHTML;blogGadget.innerHTML = replacement.replace(/s72-c/g,"s"+size+"-c");var thumbnails = blogGadget.getElementsByTagName("img");for(var i=0;i<thumbnails.length;i++){ thumbnails[i].width = size; thumbnails[i].height = size; }}
changeThumbSize("Your_Widget_ID",210); </script>
STEP 1: Log in to your Blogger account and Go to your Blogger Dashboard
STEP 2: In The Left Side Bar You will find Template Section as highlighted in the image above Click on Template.
STEP 3: Click On Edit HTML.
STEP 4: After Clicking on Edit HTML Search for
</body>
changeThumbSize("Your_Widget_ID",210); </script>
Customization:
- The Yellow Highlighted Text is Responsible for The Widget ID. Replace the Yellow Text With your Recent Posts Widget ID.
- The Green Highlighted Text is Responsible For The Thumbnail Size. if you want to Change the Size You can Play with the Code Have Fun.
STEP 6: All Done Save Your Temple & Check it in your site.
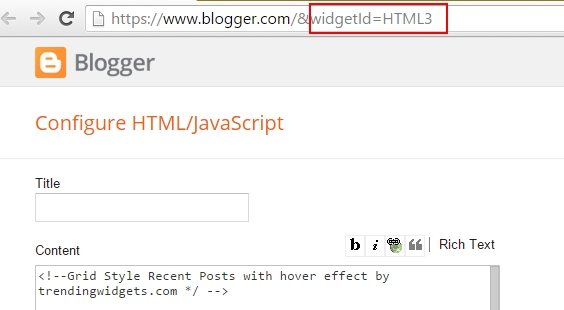
Widget ID Can Be Found In The URL Address bar in the HTML/JavaScript section of Add A Gadget As Shown in the Image Below:
That's It Thanks For Following our Tutorial 'Grid Style Recent Posts v2.0 on hover display title in blogger '' Along With us If you found any difficulty Please Comment and Share Your Valuable Opinion. And Stay tuned for More Tutorials Like This and Share this with your friends.


No comments:
Post a Comment